Your Cart is Empty

Swarovski Flatback Crystals Glass Vase Rhinestone Embellishment Project

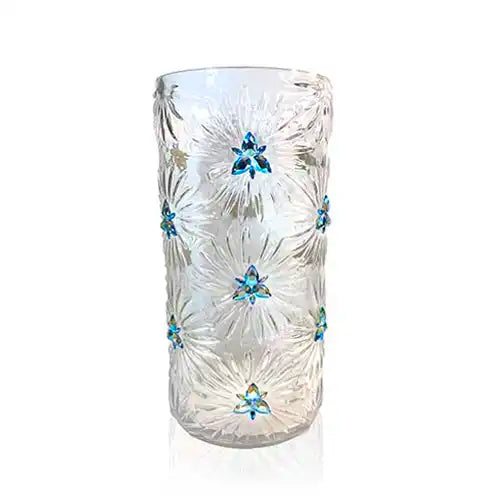
Are you a craft lover who enjoys fresh flowers and loves a touch of sparkle in your home decor? Then this Swarovski Crystals embellished glass vase tutorial is perfect for you! With just a few simple steps, you can create a stunning and unique vase that will add a touch of glam to any room. Plus, it makes a great gift idea for friends and family who appreciate handmade treasures. We have chosen to use shapes in the colour Aqua Shimmer for this design however the shapes, colour and layout of the crystal embellishment can be easily customised to suit any glass vase of your choice.
Swarovski Crystals - Apply Online Today
Bluestreak Crystals are one of very few remaining worldwide Swarovski Distribution Partners that continue to supply the complete range of Swarovski Crystals to businesses and professionals. If you would like to use Swarovski crystals, simply apply online via our website. The approval process only takes about one week and if you are in a hurry we can fast track your application so you can order Swarovski crystals the same day.
Component List:
The full list of Swarovski crystals, components and tools needed to complete this project can be found below. If you click on the product description (link), the respective product page will open, where each item can be viewed and added to cart:
| Component Image | Component Name / Link To Purchase | Component Quantity |
 |
Glass vase of your choice | x 1 |
 |
Swarovski Rhinestones Non Hotfix 2201 Marquise 8mm Aquamarine Shimmer | x 42 |
 |
Swarovski Rhinestones Non Hotfix 2303 Pear 14mm Aquamarine Shimmer | x 42 |
 |
Magic Sorting Tray | x 1 |
 |
Wax Crystal Picker Tool | x 1 |
 |
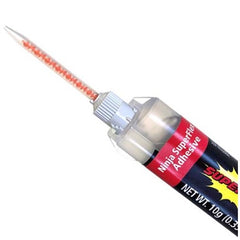
SuperTite Ninja SuperFlex Glue | x 1 |
Instructions
Step 1
Prepare the glass vase for embellishment
Ensure that the glass vase is completely clean and ready for gluing. If the glass surface is shiny and you’re aiming for full solid crystal coverage, we recommend gently sanding it until there is a rough key. This will help to give the glue a texture to securely grip to, however sanding is unnecessary for individual crystals.
Step 2
Set up the SuperFlex glue applicator
SuperTite Ninja SuperFlex Glue is unique in the range of glues available on our website because it is a two-part resin glue, that has an inbuilt mixing radio thanks to the design of the syringe and the two parts combine as it is forced through the syringe tip, meaning it comes out mixed and ready for application. So, to prepare the glue, remove the light grey stopper and twist the syringe tip into place, then push the plunger into the back and push through the glue.
Step 3
Remember to keep the glue moving
The trick to working with SuperFlex Glue is understanding that the glue has a one-minute drying time and a five-minute cure. This is exceptionally fast compared to other resin glues, and this makes it perfect for embellishments on tricky three-dimensional objects where you can’t let everything sit to dry because the crystals will slide out of place. The challenge, however, is that the glue mixes in the tip therefore the one-minute drying time starts inside the syringe before it reaches the open air. This means you have to work fast and keep the glue flowing even if not directly in use on your project. We recommend having a disposable surface nearby where you can push out a small dot of glue every few moments as a way of preventing the glue from sitting still long enough to set and block the syringe tip.
Step 4
Apply the glue onto the glass
Use the syringe to squeeze out a small dot of glue onto the glass vase where you want the crystals to go. Be careful to not apply too much, otherwise you will risk the glue squishing out in unwanted directions. We also advise doing this stage in very small sections when working on round, three dimensional objects. Thanks to the extremely quick drying time of the SuperFlex glue you can work your way all around the vase fairly quickly without having to leave it for lengthy periods every time you need the glue to dry.
Step 5
Begin placing the Swarovski Crystals in a rhinestone embellishment style of your choice
Use the Wax Picker Pen to gently place the Swarovski Crystals onto the glue. On this design we created geometric clusters in the centre of each flower, and we counted how many of each shape we would need to repeat the pattern around the entire vase. Depending on your creative choices the type and quantity of the crystals used may vary.
STEP 6
Allow the resin glue to fully dry
Let the glue dry for one to two minutes, once the glue is dry you can rotate the glass vase and continue the process, working your way around the vase until you are happy with your complete design. Thanks to the strength of the SuperFlex glue it’s ready to wash and use!
Congratulations you have completed the project !
Once the glue has dried, your Swarovski Crystals Embellished Glass Vase is ready to display your favourite fresh flowers or simply add a touch of sparkle to any room in your home. This project is perfect for adding a personal touch to your decor or creating a thoughtful gift for someone special.
Whether you're a seasoned crafter or just starting out, this tutorial is a fun and easy way to add some glam to your home decor. So, gather your materials and get ready to create a stunning piece that will be sure to impress anyone who sees it. Happy crafting!